Hi there, in this blog post I'm going to show you how to create a TV realistic looking bruise suitable for any casualty effect, or even as part of a costume to freak out your friends and family!
For this you will only need
a Mehron Procolouring Bruise wheel, which you can buy online on eBay for about
£10. This bruise wheel should last
your for ages and ages (all depending on how often you use it).

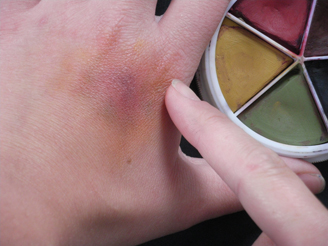
Ok so here goes, first
select the hand/limb/face/body part you want to work on. I have chosen my hand, as it is easier
for me to apply the make-up to!

Then start by using the
bright red colour. Start to apply with your finger in a dabbing effect where
you want your bruise to go. Really
think about this, as a fresh bruise will just be bright red, but the older you
get the colours change to a more green/yellow colour. It might help to have some bruising reference so you get the
look you want just right.

You don’t need to add a
lot, in fact the lighter you dab it, the more realistic it will look.

Once you have your red
centre where you want your bruise to start, then start adding in the other
colours. You will want to use the
black and dark red in and around the bright red centre you have created. Again use this sparingly as it will
look too over the top other wise, and remember to always use a dabbing motion,
NEVER RUB!


Once you are happy with the
colouring, start to then add the yellow and the green around the edges of the
of the red centre, occasionally dabbing into the red centre to give it some
randomness!

Once you’re happy with the
basic colouring and Bruise effect, gently blend out the yellow and green with
your fingers so to make it look more realistic.

You should then have a
bruise effect you are proud of!

For a facial bruise really
think about how the person got it, so where the main red centre would be. For example if I was punched in the eye
area, the eye socket bone would take the force of the blow, so that would be
the reddest part (due to the thinness of the skin) then the bruise would carry
on out around it and under the eye.

Thanks for looking and I hope you have enjoyed this blog, Please feel free to check out my websites to see what exciting things I am currently making and selling!
No comments:
Post a Comment